The Push and Pull of Installing Pads
By Curt Altarac
If you are at this step of installing saxophone pads you should have addressed the four variables of installing saxophone pads. The result of this labor should be level pad cups, level tone holes, a level pad and a pad cup that is well oriented to its tone hole. Now you are ready to glue in your pads. Having seen the work of many other repairmen and novice technicians, I noticed that padding often starts here, disregarding the previous steps. There are some technicians that are very skilled at working on woodwind pads without addressing the four variables, some even get consistent results. There are many tricks to doing work like this, and I believe that a technician who is skilled at this will have no problems working with properly leveled surfaces. I suggest you choose the amount of prep work you do based on your skills and the time you have to complete the job. Even if you choose to disregard the preparation work, a working knowledge of the variables and their impact on the finished job will help diagnose the problems that arise during your padding procedure, avoiding unnecessary guess work. The discussion of padding to follow will assume that all prep work is complete.
I find padding saxophones to be one of the most relaxing things I do in a day. With my other horne work done, I can relax in a room lit only by a burning torch, my leak light and music of my choosing. I have only the warmth from the torch and the light in the instrument to worry about. Padding is a relaxing mood, it is a calm perfection achieved by directed thought and reflection. You will do well to get into this mood and relax when you are padding. It is a discipline that takes more time when rushed, yet is more enjoyable when savored.
A pad leak is any location around a pads' seat that does not hit the tone hole at the same exact time as the other parts of the pad. If you have any question about the the pad you are working on, wondering if the light you are seeing is a real leak, the answer is: yes it is a leak! Knowing this information, do not deviate from removing every leak on every pad as you work on the instrument.
The most difficult part of padding any woodwind is looking for leaks and not hiding them.
An impatient finisher (or padder) will only look for leaks and pay little attention to the part of the pad that does not leak. He will press the pad harder on to the tone hole, where there is light showing, in a effort to hide the leak from himself. He will question if a small amount of light showing on a pad is a leak, saying to himself, “it is too tiny to worry about” or “it only takes a little pressure to 'seal' the pad on the tone hole.” This attitude is very common among finishers who have not seen the results of good pad work, as well as those without the time or patience to do an exceptional job.
An exceptional finisher on the other hand, will slowly close each key checking for the part of the pad that hits first, always working for a perfect simultaneous hit all the way around the tone hole. When she finds the part of the pad that hits first, she will diagnose the problem. She will notice any light and fix the corresponding leak. Knowing that even with the most scrupulous workmanship, perfection in padding can never be completely achieved, she will strive for it.
You should strive to be an exceptional finisher!
Understanding Shellac:
There are many ways we could adhere a woodwind pad into a pad cup and there are many different types of pad glue, including: shellac mixed with alcohol (know as Liquid shellac), hot glue and clear shellac, amber shellac, Georges glue, etc.. The two most common "adhesives" are shellac (which could be a number of things) and hot glue (which could have a number of properties). The "hot-glue or shellac" debate between technicians rages on. In this article, I will call it “shellac” but you can use hot glue if you wish. The properties of each are the same for our discussion here.
In case you are curious, we use Shellac from the Z-Gun. This shellac is a special clear shellac that I have used for years. I choose this shellac for installing woodwind pads because I like the firm backing it gives and I find it holds up over time with unlimited re-heatings and virtually no break down of its adhesive properties. Also, I use this shellac in all my pad cups because of it's low coefficient of expansion. When heated it does not expand making pad leveling easier. I have not found hot glue to have these same properties.
No matter what you choose for your pad work be sure that it melts when hot and cools solid, never use a liquid shellac unless you are very accustomed to doing so. Again, for simplicity sake I will refer to the material behind the pad cup as “shellac.”
When installing woodwind pads, a working knowledge of the shellac you are using will be very helpful. Eventually you will understand exactly how much heat is needed to properly heat the shellac. This knowledge along with your working knowledge of your heat source, will give you very consistent results. Novice repairers tend to use too much heat too fast. The result is burnt or discolored lacquer on the pad cup.
To gain a quick understanding of how fast your shellac will melt, experiment on a junk key cup or use a large spoon. Put some shellac in the cup and apply heat with your torch. Watch the shellac melt, if it bubbles, you are applying too much heat. Note that the shellac will continue to heat even after the torch is removed from the metal pad cup. This is vital information for you when you are padding.
Understand your heat source (torch):
There are three aspects that you must remember about your torch.
1. It's too hot.
2. Heat flows.
3. Heat rises.
If you keep these in mind you will not burn a pad cup, nearby corks, felts or damage an instrument. When the flame is on the pad cup remember that it is too hot. You must move the flame around to keep all that heat (often 1600° Fahrenheit) from overheating one spot on the cup (lacquer burns around 400°).
Keep in mind how heat flows. It is possible to heat one side of a brass pad cup so hot that lacquer burns while the other side is not hot enough to melt shellac. Metal is a great conductor of heat. Allow the heat time to work into the cup and warm the shellac. Apply the heat (constantly moving the flame as you do) then remove the flame from the cup. Although you are not applying heat to the cup, the heat from the pad cup will continue to transfer to the shellac. Let it work in for several seconds before you apply heat again.
While you are being careful not to overheat your cups, keep in mind that heat flows upward. It will be faster to heat a cup if the flame is under the cup. It can also be more dangerous so don't forget about this important aspect of heat travel. Also, keep heat travel in mind when avoiding unnecessary burning of nearby corks and felts. A cork below the flame on a nearby key will not burn. A cork above a flame will burn quickly. The same is true for felts and pearls. So, move the instrument as needed to keep the parts you want cool below the flame and the parts you need warm above or in front of the flame.
There are many torches that one can use for installing pads. I have a favorite and this is it.
Choose a pad that fits:
Make sure the pads you are installing fit inside the pad cup with a snug fit. If a pad is too tight the felt can bunch up causing phantom leaks, undetectable with a leak light, and a pad that is too small will be nearly impossible to level and can fail prematurely.
The procedure for installing a saxophone pad:
Put the pad in the cup:
- Apply shellac to the back of the pad. Be sure to apply enough shellac to fill in any recess on the pad caused by the reso or the leather backing.
- Heat the pad cup and apply a small amount of shellac to the entire inside of the pad cup including the side walls.
- Press the pad with shellac into the pad cup. Reheat the cup if necessary.
- Be sure to press on the middle of the pad. Doing this will force any air behind the pad out the sides. If air is oozing out the side of the cup when you press the cup in, keep working the air out. It is possible to boil shellac in a cup. Doing this may give you false impression that there is air behind the pad.
Put the key on the instrument:
If the key you are working on is sprung closed, disengage the spring when possible. This will keep any unwanted seats in the pad from appearing before the pad is leveled. Otherwise put the key on the horn.
The Tap:
Roughly float your pad into place. During this step you will do the most adjusting of the pad. When done, the pad will be firmly held in the cup and close to level. For this step, you need a torch and a leak light.
Get all your tools laid out in front of you and be used to putting them down in the same place. Although you only need a torch for this step, as you gain experience, you will be able to do these steps (The Tap, The Push and The Pull) in rapid succession; possibly without letting the shellac cool between steps. So, be ready with your tools at all times. This will help you work in a dimly lit room without losing your tools and wasting valuable time.
Put a leak light in the instrument positioned so there is light behind the pad you are working with. Turn down the lights in the room.
Heat the pad cup until the shellac warms and is flowing.
Tap the pad on the tone hole to begin leveling it. This action is much like playing a trill on the instrument. Once this is done, you should have a pad that looks OK but needs some finish work. If you find that the pad is not close to level after The Tap, go to The Push and come back to the The Tap (or some missed step in the prep).
The Push:
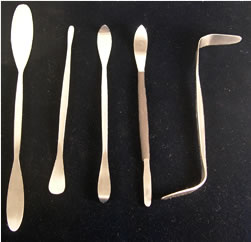
Start leveling the pad. I call this step 'The Push'. It only requires 3 tools. A torch for heat, a pad slick and a leak light. I use 5 pad slicks most often. The large and small double sided pad slicks are right from our site and the other three are these same slicks (from the site) that I modified on a grinder or with pliers for specific instruments such as curved soprano saxes.
Slowly close the key you are working on, looking for any part of the pad that hits the tone hole first (called 'high spots'). When you find the high spot, note its location.
Heat the pad cup to soften the shellac bed behind the pad. Apply heat to the entire cup, if you are going to have success pushing the high spots into the cup, your displaced shellac needs a place to go.
Using a pad slick, gently press any parts of the pad that hit the tone hole first up into the pad cup. While the shellac is still warm, continue to work the pad back into the pad cup where it hits the tone hole first. If your prep was done well this should also level the pad in the cup. If you find that you are pushing one part of the pad far into the cup and another part of the pad is sticking out of the cup, there is something wrong with your prep; probably a problem with the dry fitting. Going back to fix such a problem is a good idea, it will save you time in the long run and result in a better job.
When the shellac cools, check the pad again looking for parts of the pad that hit the tone hole first. Repeat step 3 until you can no longer press the high spots into the pad cup.
When you feel that you have pressed all the high spots into the pad cup and can do no more, you should have a pad that is nearly leak free. The leaks in the pad will be very small and require such low pressure to hold them closed that the instrument would play great if you stopped now. When this is the case, move to 'The Pull'. If you do not achieve these results, something is wrong or improperly prepped.
The Pull:
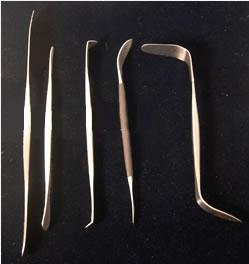
With the pad in the cup and nearly level, The Push is done. You are now going to pull the parts of the pad that do not hit the tone hole out of the cup and to the tone hole. Leaks removed during The Pull are very slight. The bulk of your pad work should be done with the pad slick during The Push. The leaks you are removing during this step are only a result of inconsistencies in leather and felt in the pad. When I use RooPads I have to deal with fewer of these problems. The Pull leaks are hard to find and never more than the thickness of a hair. This part of the padding process requires 3 tools, a torch, a pad prick and a leak light. All of the pad pricks I use started life as this tool. Here are a few pad pricks that I have modified and use during padding:
During The Push, you may find that you misjudged some of the leaks. If you feel the leak is too large to remove using The Pull, go back and do The Push with the pad slick until you are satisfied, then come back to the pad prick (The Pull) when you are ready.
During The Pull, you are looking for leaks, not for the parts of the pad that hit first. This is an important distinction between The Push and the The Pull.
The Pull Procedure:
1. Put a leak light in the instrument, positioning it behind the pad you are working on.
2. Find the small leak you are hoping to remove and note its location.
3. Heat the pad cup directing your heat toward the part of the pad that has the small leak.
4. Slowly press the pad closed so only the leak you are planning to fix shows light.
5. With the shellac warm use your pad prick to pull the leak out of the pad by gently poking the pad on its side and pulling it from the cup.
6. Hold the pad prick in the pad with downward pressure to the tone hole until the shellac cools.
7. Check to see that you were successful. Repeat step 6 if not.
The craft of padding a saxophone is defined by the technicians patience, caring and knowledge of his tools. Knowing when to Tap, Push or Pull is vital for good pad work. The science of installing a pad is clearly measurable during padding preparation. As a padder, I try to remove the art of what I do whenever possible. I replace this art with a clear and predictable scientific approach. The final finishing of a woodwind pad, for me, is currently more art than science and this is something I am in the process of changing. The procedures outlined above are merely a snap shot in time, the process used during the writing of this article. The padding of woodwind instruments is constantly evolving here at the MusicMedic.com repair shop and I will remain open minded to better ideas as they present themselves. I hope you too will keep an open mind to my process and let me know if you find a better way!
Copyright © 2000-2012
MusicMedic.com
All Rights Reserved