Swedging Woodwind Keys
What is Swedging?
In a world where skills and craftsmanship are all but lost to replacement and disposability, the Music Industry is holding its ground. Instruments needed to perform to a very high level and consistently must be smooth running, well-oiled machines. In woodwind repair, key fitting is literally the pivotal point between greatness and mediocrity. The keys of a woodwind instrument are usually made from brass and sit between brass machined posts. With the precision of a clockmaker, the instrument repairer uses specialized tools, stretches the metal and cuts new surfaces. Each key is reshaped to fit perfectly in its place and each place is made to be the perfect receptacle for the key. This, the art of making the various keys on a woodwind instrument function properly and consistently, is known as key-fitting. Fitting keys is often done at an extremely high level and many repairers proudly consider their key-fitting to be the benchmark of great work. One of the techniques used in key fitting is swedging. In this article, let’s look into swedging keys on a woodwind instrument.
Proper key swedging is the most important key fitting procedures in the transformation of a clunky saxophone to a lightning-fast, ultra-quiet machine. So, what is key swedging? Well, don’t look it up in the dictionary, the term ‘swedging’ is the most common way to describe elongating hinge tubes while reducing the inner diameter. The term swedge no doubt comes from the word with a similar meaning, ‘swage’ meaning “shape (metal) using a swage, especially in order to reduce its cross section.” Swedging increases the length of the key and can reduce the inner diameter. Increasing the length of the key removes the space between the end of a key and the faces of the posts. Reducing the inner diameter of the key removes the space between the inside of the hinge tube and the hinge rod. The act of swedging is squeezing the hinge tube of a key in order to both lengthen the key and to reduce the space between the inside of the hinge tube and the hinge rod.
Why is Swedging Necessary?
Swedging keys is a vital step in the process of making the instrument work properly and last a long time. Properly fit keys improve the feel of an instrument, reduce key noise, and aid in the seal and seat of the pads. Some believe that swedging keys removes vibrations in the instrument making the instrument respond like one solid piece which improves tone and response. Most repairers fit because they either don’t appreciate the tolerance of brand new instruments or they need to remove years of wear and damage caused by both players and shortcuts by technicians. Every time a brass bodied instrument sustains a fall or similar damage, keys will need to be refit. No matter why you are swedging you will be solving several key-fitting problems in one procedure while extending the life of the instrument.
Preparation is vital
You can’t build a house on sand and you can’t properly swedge keys on a damaged body or in between misaligned posts. Of course, the body of woodwind instruments is imperfect at some level. Sometimes from manufacture, sometimes from damage to metal or wood, even expansion, and contraction of natural materials add to the instability. These imperfections are taken into account and corrected to the highest level possible before swedging begins.
Briefly, here is the process which must be completed. If you are unfamiliar with our process, consider reading this article and the bodywork and key-fitting checklists.
Here you will find more detail about the steps involved in preparing an instrument for key-fitting:
-Prepare the body. Ensure it is straight and rigid, and that the posts are parallel.
-Straighten, replace, and clean rods as necessary.
-Align posts so that the pairs and groupings of posts are perpendicular to the body and the post faces are completely parallel.
-Straighten keys so that the straightened rod can pass evenly through the hinge tube of the key.
-Compound keys, those with two separate sections of hinge tube, must be straightened so that the rod passes through both sections without friction.
-Deburr the ends of the keys. On instruments that haven’t been worked on much since they left the factory, you may find that there is a slight edge or burr from the original cutting of the key. Removing this now speeds up key-fitting and gives the key a uniform edge, which will be completed when the key ends are faced.
Once these steps are complete we are almost ready to begin the process of swedging. First, we need to make a good place for our newly lengthened and faced key to live. To do this we need to face the posts. Note that we use the same tools for facing posts and cutting down hinge rods.
The Process of facing posts
The goal of swedging a key is to have it fit perfectly in it’s home with maximum contact and zero friction. If the postface is not flat because it was buffed, damaged by a repairer, worn or simply never was flat (most are not) it will be necessary to face the post. This will leave a smooth and flat surface that the entire key end can rest on. Since there are posts on either side of the key, flat and parallel post faces make an excellent and true home for you newly swedged key. The flat post face must be perpendicular to the hinge tube and parallel to the key end. The MusicMedic.com post and key facing tools are excellent for this job. The long pilots and the pilot driven characteristic of the tool ensure that the cut is parallel and perpendicular. The hex shape of the tool allows it to be sharpened when dull rather than replaced.
Here are the steps involved in facing two posts when neither is threaded using the MusicMedic.com post and key cutting set. Watch the Video
- Choose a pilot size
- Place the lower pilot through the posts past the area to be faced
- screw the cutter into the pilot
- insert the top side pilot and screw it in also
- Push cut the bottom post
- Pull cut the top post
In the case where the last post is a threaded post, you will need a pilot that is small enough to fit the threads.
- Choose the correct pilots, one for the threaded post and one for the longer section, the driver
- Slide the long pilot through the post and screw it into the cutter
- Push cut the threaded section
- Pull cut the opposite post
Some problems are better resolved without swedging
There are times when fitting keys that it is best to do a different operation to solve the problem of a loose fitting key. Some of these times include the ones mentioned below. Generally, swedging is the fastest and most simple way to fix key play, so it is often what you will try first. If it’s not a good time to swedge, that will likely make itself apparent as swedging will not be possible or predictable.
For example, some rod-mounted keys with lateral play may have sections of the hinge which are too short to swedge, so this is addressed by adding a key extension. Key extensions are more commonly needed on pivot screw mounted keys which cannot be swedged to solve lateral play. Basically, a small piece of brass is machined to the dimensions of the existing key and soldered on to the end of the key to add length to the tube.
Some keys, especially the compound F# keys on the saxophone bottom stack are very difficult to swedge. Often the small section of the F# key is very loose on the hinge rod. It may be impossible to get long lasting results by swedging this area. In that case, it is necessary to drill or ream the center of the hinge tube out and replace the inside of the hinge tubing. This gives the hinge rod inside the key a new surface to connect with and will greatly extend the life of the instrument while making later adjustments far more simple and reliable. The process of making a key extension or sleeve is outside the scope of this article and mentioned only to note that sometimes more than swedging is necessary to have a tight connection between the key and the hinge-rod.
There are also instances, especially in vintage instruments which may have substantial wear from many decades of use, where the diameter of the rod is substantially smaller than the inner diameter of the hinge tube and it would substantially alter the key to swedge it enough to close the gap. This is an appropriate time to create an oversized rod. Test your rod stock by passing it through the key, finding the largest piece that passes through without friction. Cut to size, cut new threads, and slot the top. You may need to carefully adjust the size of the opening in the post. If you are already replacing some rods due to pitting, excessive rust, or damaged threads, this is a good time to consider a slight increase to the rod size when the excessive internal play is present
Saxophone Palm keys and side Bb and C keys are often removed during any type of repair work: their pads wear out quickly and these keys are played with more force than stack keys, which can result in bent rods, bent threads, and spread slots. These are difficult to straighten due to their short length and are great candidates for oversize rods. The amount is typically .0005”, such as going from a .1095” diameter to a .110”. The G# lever can also be considered in this group.
Swedging Pliers
 There are many methods and tools with which to swedge a key, and this process is one that I’ve given serious thought to for as long as I’ve been repairing saxophones. A good tool allows you to essentially crimp and elongate the hinge tube. Some special pliers allow you to get into tight spaces.
At MusicMedic we designed a variety of differently shaped pliers to make swedging efficient while doing as little harm as possible to the finish of the key. Because swedging uses a steel tool to crush a softer brass tube over a steel rod there is a great likelihood of marring the key, especially when the key is plated with silver or gold, or lacquered. Keys plated with harder metals such as nickel tend to fare better against the swedging. Regardless of the trace evidence of swedging, it is simply a necessary trade-off for properly fitting the keys. That said, the somewhat magical process of crushing brass yet leaving a finish that looks like jewelry is a pride that many technicians quietly revel in. When they are done with key fitting, not only do the keys fit perfectly without friction, they look like no one ever worked on them. This is another reason that key-fitting is revered as one of the true crafts in the industry to many repairers.
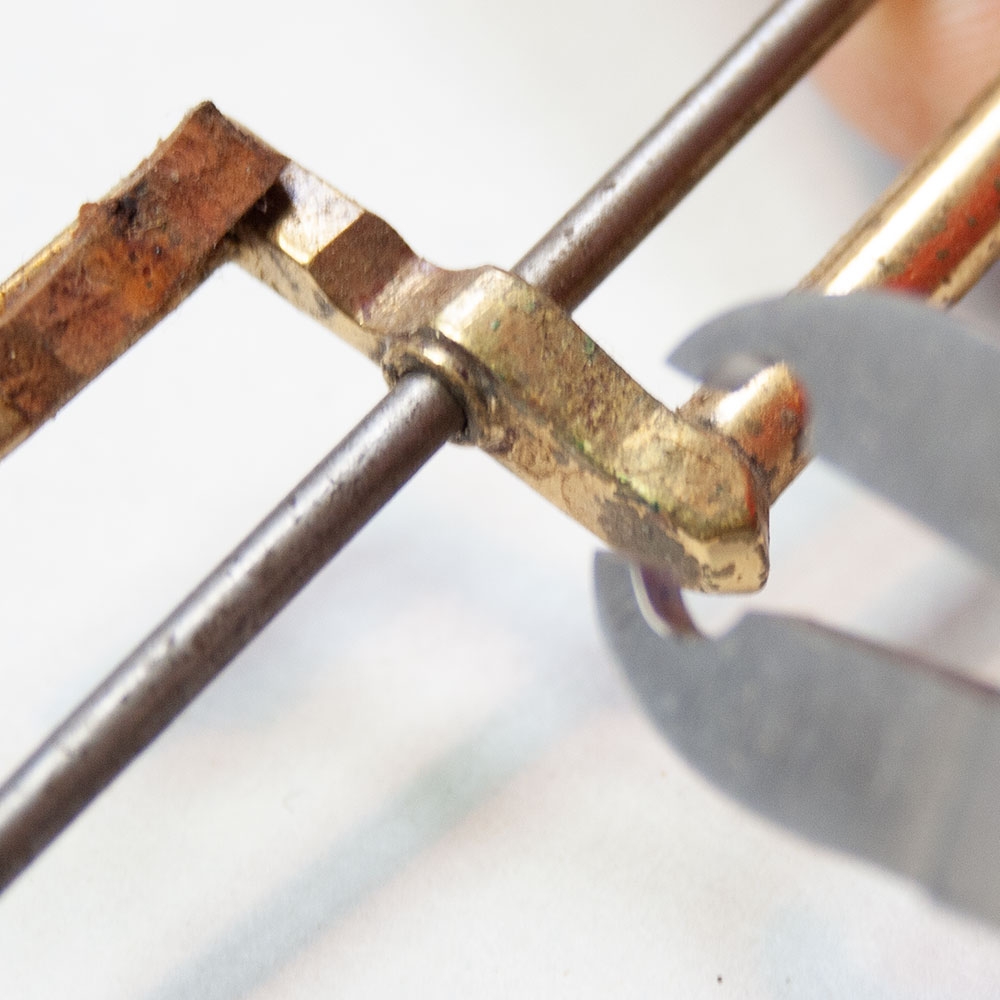
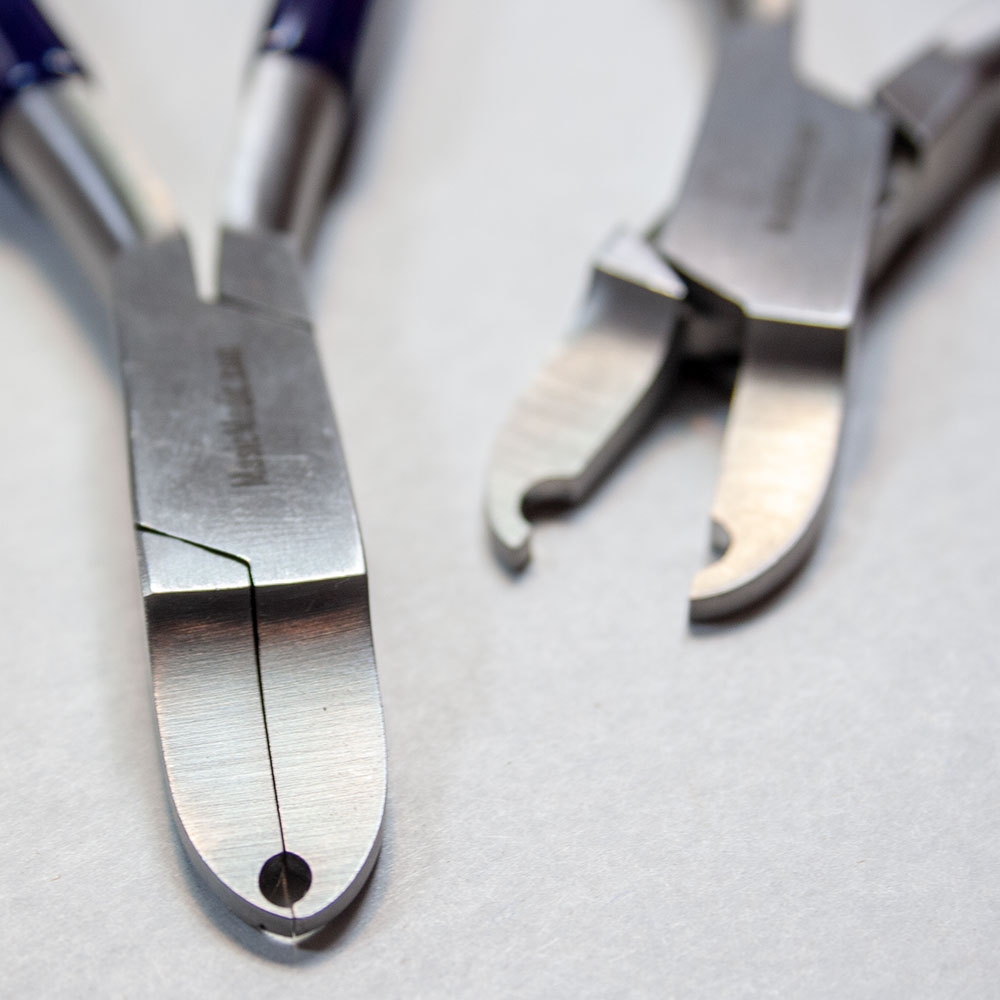
Swedging Pliers are used to crush brass over the steel rod and elongate it. The power they exert, the smoothness of the jaws, the degree to which the faces of the jaw are parallel, and clearance are the main factors that distinguish one plier from another. Most pliers have one or more holes cut through the jaws so that the jaws of the plier can close together around the key’s hinge tube. 4mm and 5mm are the most commonly needed sizes for saxophone work while 3mm small swedging pliers are most often used for clarinet and flute.
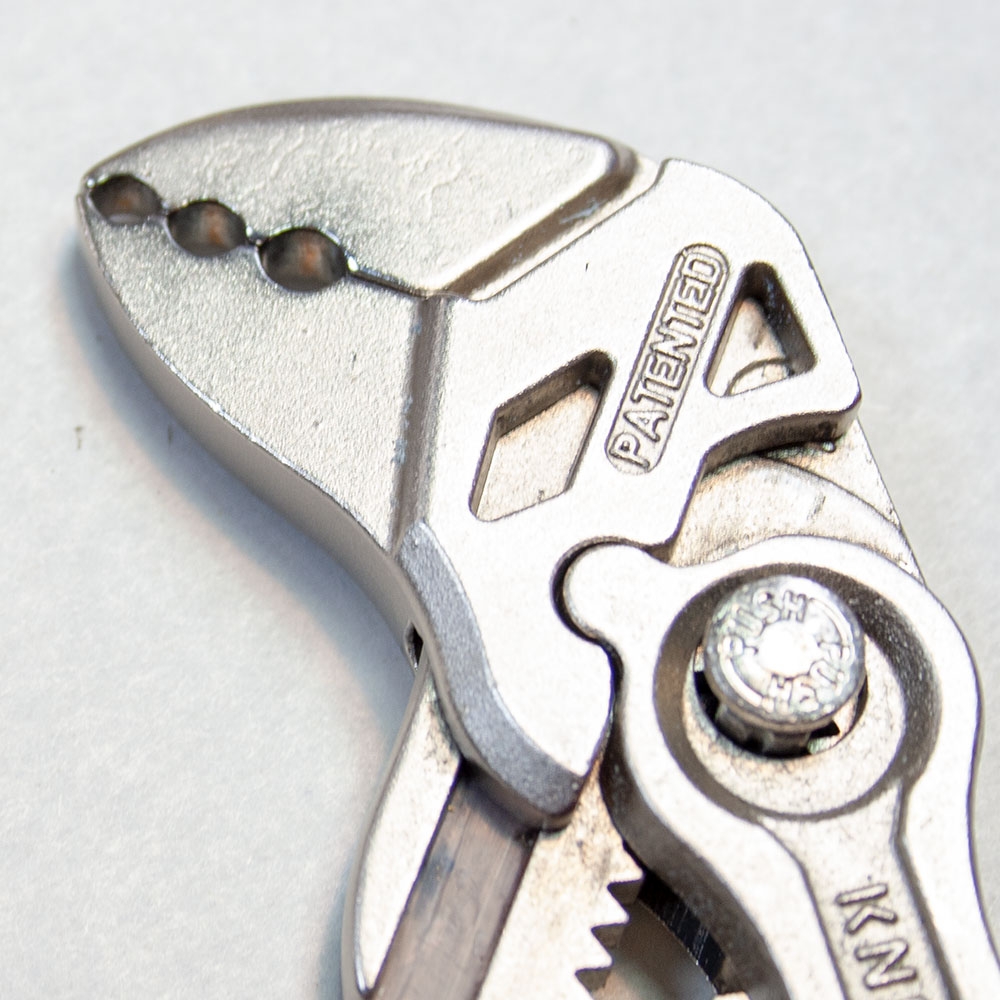 In instances where you have open access around the hinge tube, unencumbered by key arms and pad cups, with plenty of length, our favorite and most used plier is the 3 hole Knipex Parallel Swedging Pliers. The sliding action of the jaws is not completely lost in these modified pliers. The jaws occasionally can be slid open and closed over the area that needs to be fit. However, the true benefit of these pliers is both the hardness of the metal and the extreme mechanical advantage the pliers offer. This reduces fatigue and allows a new style of swedging which I will explain. In instances where access is truly a problem and there is only a small amount of accessible hinge tube, use the Thin Key Swedging Pliers. On Saxophone there are times when the three-holed pliers are too cumbersome and the more simple, Medium Knipex 5mm Hole Parallel Swedging Pliers or the standard Saxophone Key Swedging Pliers will save the day.
Beginning Swedging
Once you are certain the rod is straight, the key is straight, the posts are perpendicular to the body, the post faces are parallel to each other and faced, the springs are disengaged, and everything is clean and oil-free, you can check for lateral and internal play. There are many instances where you will only have either lateral play or internal play. Even when you only need to eliminate internal play, the process of swedging will elongate the key and it will no longer correctly fits between the posts. You will then need to cut new faces. That said, no matter why you are swedging the result and the technique are nearly identical.
There are two basic swedging plier techniques: one which helps preserve lacquer and other soft finishes and the other which is faster for bare brass or newer harder metal finishes. No matter what technique you use, always swedge with the Steel Rod inside the key. This is a lesson most of us learn the hard way. You will always will the key too long and cut the ends meaning you will swedge the key too much then cut it back. This is necessary to achieve our goal of flat surfaces perfectly mating with flat surfaces devoid of friction.
On lacquered finishes, the lacquer will flake off easily under the pressure and contortion that swedging exerts. Friction at the surface can heat the lacquer or just rip it off the metal key. To prevent the loss of lacquer we generally use swedging pliers in a series of squeezing motions. With the pliers in your hand and the key and rod in the plier; squeeze firmly on the key, now open the pliers rotate the key and squeeze again. Repeat this process to elongate the hinge tube. In my experience the Knipex Swedging Pliers are the only swedging tool with a mechanical advantage sufficient to exert enough pressure to reasonably use the squeeze, open, rotate, squeeze technique.
The second, more traditional technique is used on bare brass, some lacquers, and some hard finishes. This technique uses less force and allows you to work faster. This way you close the pliers around the hinge tube and rotate the key as you apply pressure. There will obviously be more friction between the surface of the key and the plier jaw. To counter this friction, technicians will: use lubricants such as beeswax, paraffin wax, grease or oils such as ULTIMAX High Key Oil, as well making certain that their tools are clean free from imperfections. In some instances, you can also burnish away swedging marks from the key following key-fitting.
No matter what tools or techniques you use for swedging, you will continually check that the rod can still move freely in the hinge tube. As the inner diameter of the hinge tube is reduced, you may find that there is friction between the hinge tube and the rod, this friction will need to be addressed.
Addressing Friction
Friction is the enemy of a good feeling musical instrument. When trying to get an exceptional fit on your keys, there is a delicate line between slop and friction. When a key is perfectly fit, the posts on either end have parallel and flat faces and the key itself has parallel and flat faces that perfectly mate with post faces. There is no binding on the hinge rod and the key moves freely without any excess motion in any direction. To achieve this often requires the ability to make rods, straighten rods and straighten hinge tubes, lap, and ream. Each of these techniques deserves an entire article and is too involved to discuss here. For this article, I will assume that after you have elongated by swedging, you are able to remove any friction between the key and the hinge rod.
Cutting key ends after swedging:
When we talk about swedging keys, we are certainly also talking about cutting the key ends to fin in between the posts. In this article, we discuss making the faces of those posts flat and parallel. One might wonder why you need to cut a key end if it has been wedged just the right amount, can’t it just fit between the posts? Swedging keys certainly elongates them but never uniformly. That is, the length of the key is increased by swedging but not evenly at the contact surface that is the key end. The outer surface of the tube lengthens at a faster rate than the inner surface and sometimes in a potato chip uneven fashion. For this reason, it’s necessary to swedge the key so that it is too long to fit between the posts and cut it down precisely to fit. Once the hinge tube is elongated, the key ends can be faced until completely flat and parallel with the already flat postface. You can imagine how the flat post face will mate with the flat key end and last a long time.
To get our key ends flat and true, we use the same tool and technique used on the post faces. Key cutters and post facers are the same tools. They are rotating tools that use a pilot in the hinge tube to be sure that the newly cut key ends are perfectly parallel to each other.
To cut your key ends with the MusicMedic.com key and post facers: Watch the video
- Select the pilot that matches your hinge rod diameter
- Select the largest cutter available
- Put the pilot into the pin vise
- Put the pilot through the key
- Pull and cut
- Remove the pilot and debur
- For compound keys, do the same
Moving Forward With Key Fitting
There’s still plenty of work to be done key fitting after the swedging is done, starting with pivot screw keys, but we’ll save that for a future article.
As always, if you have any questions or comments, please email questions@musicmedic.com.