Setting Key Heights with The Balanced Venting Method
By Curt Altarac
I am often asked "how high should I set the the key heights on my saxophone?" The person asking the question surely thinks that I have a list of key heights gleaned from some non-existent factory specification list. My answer to this questions is not unlike the old joke "How long do a German Shepherd's legs need to be?" the answer being, "long enough to touch the floor!" Similarly the key heights on a saxophone must be open enough for the saxophone to sing. More specifically, the key heights should be set for the instrument to play in tune with a full and responsive tone.
Although there are many techniques for tuning and toning a saxophone, proper key heights are the first and most important step of the procedure. Once key heights are set properly tuning and toning with other methods will be much simpler.
Traditionally key heights have been set by the repairer to look and feel correct. Some repairers keep lists of key heights they have been successful with on certain models of saxophones. These methods have resulted in theories that all of the keys need to be set to the same height for the saxophone to play well or that the upper and lower stack heights need to match in order for the instrument to play with a balanced tone. After using a method that sets key heights based solely on tone, intonation and response, I submit that each instrument will dictate it's own specific optimal key height to the repairer or player.
I have developed a method for setting saxophone key heights called the Balanced Venting Method that allows the instrument to speak in a responsive and full voice while balancing intonation and mechanical function. The Balanced Venting Method is very simple to use and nearly as simple to understand. Using this method of setting key heights is a good start to tuning and toning a saxophone without compromising response. Although this method of setting key heights works well for all sizes of saxophones, mechanical references in this article will refer to the alto saxophone.
In order to discuss tuning and toning saxophones using key heights, there are some basic ideas that must be understood. The first and most important idea is that every tone-hole on the saxophone has a corresponding note. As fingers are added, keys are closed on the saxophone and the effective length of the instrument increases and the pitch lowers. Pitch is basically determined by the length of the instrument from the mouthpiece to the top of the first open tone-hole. It is the pad height of this first open tone-hole that we will be concerned with in this article. When we discuss key heights for a particular note it is the first open tone-hole's key height that we are talking about.
What is Venting?
Although there is a point of diminishing returns, the basic rules of key heights are as follows: As a pad is raised farther from the tone-hole (venting is increased), the note becomes less resistant, more free blowing and the pitch becomes more sharp. As a pad is set closer to the tone-hole, the tone becomes more resistant, less free blowing and more flat.
Venting is a term used to describe how efficiently air, or the sound wave, is able to escape the body of the instrument. As a key's height increases so does that note's venting. Although venting is very strongly related to a pad's height from the tone-hole, there are other factors that dictate how well a note is vented. These factors include the size of the tone-hole, the texture of the inside of a tone-hole, the shape of tone-hole and most important to this article, the location and size of other tone-holes further down the instrument.
Due to mechanical constraints, some pads on the saxophone are held closed and some cross fingerings are necessary. That is, the first open tone-hole for a note may be followed by a closed tone-hole, or a series of open tone-holes. For ease of discussion lets give these two situations names. Let us call notes that escape out of one open tone-hole followed by a closed tone-hole "under-vented" and notes that escape from an open tone-hole followed by one or more open tone-holes, "well-vented." An example of an "under-vented" tone is middle and low E (the second tone-hole Eb, is held closed), an example of a "well-vented" tone is middle B.
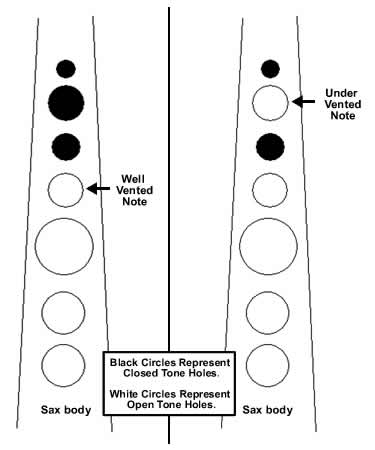
In the diagram above, open holes, or pads that are not closed are clear. Closed pads are black. On the left is a well-vented note. Notice that the first open tone-hole is followed by at least one more open tone-hole. On a saxophone, this would be a Bis Bb.
The diagram on the right is an under-vented note. Notice that the open tone-hole is followed by a closed tone-hole. On a saxophone this note would be third space C.
Players have unwittingly known about venting for years. To the player "increased venting" is simply called an alternate fingering or false fingering. These fingerings are often used by players to regulate venting or bring notes into tune. For example, adding the low C# key to the low D fingering to bring it into tune and help it speak. Players often open that second closed tone-hole on an "under-vented" note to allow the tone proper venting. Conversely, players will use alternate fingers to close pads on the horn to decrease venting or, as they say, "shade a note" when a note is a "well-vented" note.
Nearly without exception the size and location of the tone-holes on the saxophone directly correspond to the venting of the note that comes from that tone-hole. Remember that venting is a combination of many variables including key height, tone-hole size and the number of open tone-holes in a row for a given note.
Well-vented notes are fortunate in that they get their venting from the first open tone-hole and the following tone-holes as well. Because of this, well-vented notes do not require a very large tone-hole nor do they usually require very open key heights. under-vented notes must get their venting from increased tone-hole size and higher key heights.
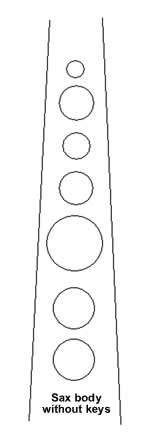
As you begin to consider which tones are under-vented and which are well-vented, look at the bare body of a saxophone with the keys removed. You will notice that, although the bore of the saxophone is nearly a straight cone, tone-hole sizes and locations do not appear to directly correspond to this cone. Although the tone-holes get larger toward the bell of the saxophone, there are a number of places in the tone-hole lattice where a larger tone-hole seems to be put right between two smaller tone-holes. In fact, the size of the tone-holes almost appears to be random yet gradually getting larger.
Considering which tone-holes relate to under-vented notes and which relate to well-vented notes will quickly solve this mystery. The tone-holes for under-vented notes, for the reasons we discussed, must be made larger to facilitate proper venting. The tone-holes for well-vented notes can be made a little smaller because they need no extra venting. One interesting situation is when an under-vented note is preceded by a well-vented note. The under-vented tone-hole, which is now increased in size, allows the well-vented tone-hole above to be made smaller. This tone-hole is smaller because the under-vented tone-hole below is so large that it aids the tone-hole above it in venting. This chain reaction continues up the instrument until a compromise is found. Knowing this, the apparently random tone-hole pattern on a saxophone body makes more sense.
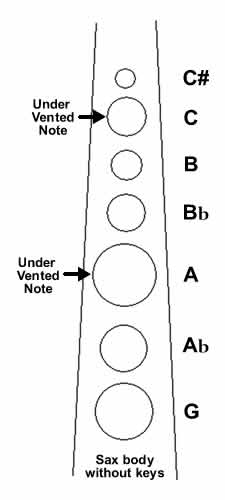
Notice in the Diagram above that every large tone-hole corresponds to an under-vented note.
For years manufacturers have struggled to get saxophones to vent properly, some have had success but many have not. It is the job of the repairer to understand the limitations of the instrument. The goal of the Balanced Venting Method is to use this knowledge to aid in the task of setting key heights on the saxophone.
The Balanced Venting Method
The Balanced Venting Method takes into consideration the under-vented tones and uses them to set a minimum key height for a group of keys. The first step is setting the key heights for the notes that need the most venting. under-vented notes are as follows:
C (LH 2)
A (LH 1 2)
F# (LH 1 2 3 , RH 5)
E (LH 1 2 3 , RH 4 5)
D (LH 1 2 3 , RH 4 5 6)
Any other notes on the saxophone can be considered to be well-vented notes.
Considering that under-vented notes will most likely need more venting (higher key heights), it is important that we start with these notes when setting key heights. This is the foundation of the Balanced Venting Method. Starting with these notes, we will be able to set all of the key heights, allowing the instrument to be properly vented.
Trill keys such as side Bb, side C and alternate F# are never notes that only have one open tone-hole. Further, they each have a secondary tone-hole in the same location. That is, there are two Bb tone-holes, one in the top stack and one under the trill key pad. The same is true for side C and alternate F#, for this reason, these keys should not be considered when discussing venting tone-holes.
Now that you know where the Balanced Venting Method of setting key heights comes from, here is the procedure. I believe you will find that setting the heights actually takes less time than reading this article!
Upper Stack Key Heights
Begin setting key heights when the horn is completely assembled before cork is on the key feet. All of the pads should be level with a perfect seal and the timing should be set. We will first set the key height for the tone C which is the first under-vented note on the instrument. In the top stack, it is C, that will require the highest key height. Knowing this, we will set the height for the tone C first.
Play an octave C while slowly closing the B key pad; where the tone C escapes. As the B pad gets closer to the tone-hole the C will become more resistant and stuffy. Set the B key height as low as possible without compromising the tone or response of the C. Once the height is set for this note play an octave C very loud and listen for disturbance. If there is no disturbance in C at high dynamics and the tone is acceptable, congratulations, you have now set the height of one key!
Using the height of the B key as a guide, set the height of the A key to match mechanically. By setting the height of the A key and the B key the same, you have now set the key heights for the tones C#, C, B and Bis Bb while removing any lost motion.
Now, set the crucial height for the top stack G pad. This is the open pad when A is played. "A" is the second under-vented note we come to in the top stack. Luckily the G pad (third finger LH) is free of the mechanical restrictions that govern the C# , C, B and Bis keys, and should be regulated separately.
This is contrary to the traditional method of setting key heights. However, if the traditional method of matching the top stack pad heights actually produces the best tone, the G pad height will end up matching the others in the stack simply by default. Pay careful attention to the tone and response of the note "A" when setting the G key height. Often the second octave A is fuzzy or breathy, there is a good fix for this but that is a subject for a later article. Opening the G key will alleviate some of the fuzz in the tone but it may not be possible to remove it all using key heights alone. Once the G is set, your entire top stack key height is set.
Lower Stack Key Heights
Conveniently, the bottom and top stacks are very similar. Setting the key heights for the bottom stack is done in exactly the same manner as the top stack. Just as the second finger C in the top stack is an open tone-hole followed by a closed tone-hole, so is the second finger F# in the bottom stack. As we began with C on the top stack, we should begin with F# in the bottom stack.
Playing a low F#, slowly close the F key, listening for tone and response. With the F key height set, set the E/F# key height to match. Now your first two fingers in the lower stack are done.
Like the G in the top stack, the low D pad (The pad over the first open tone-hole for E) in the bottom stack can and should be set independently. Like the G pad, it is also followed by a closed tone-hole and its height is critical. E is an under-vented note. It is not vital that the D pad open the same as the F, F# and E. In many cases the Low D pad will need to be higher than the other three. In some cases one must bend or file to allow that pad to open properly with the proper cushioning material under the foot. Again, setting up this last key differently than the rest of the stack is not traditional.
As you can see, we have set up each stack on the saxophone separately without considering how one stack interacts with the other mechanically. Saxophone key height differences between the upper and lower stacks are limited however, by the design of the bridge Bb key. Lower stack key heights may need to be set higher or lower than the upper stack for proper tone and tuning. In this situation, a repair person who uses tone and intonation as their guide may need to modify the Bb lever to facilitate proper regulation. Because the Bb bridge key and the F# pad operate on two opposing fulcrums, it is possible to change the relationship between these keys. By changing where these keys contact one another, one can control the movement of each key. This modification will allow the height of each stack to be set independently. This is a permanent modification and should only be done by a skilled repairer.
With the two stack heights set, we are ready to set the rest of the key heights. Play a middle F and adjust the mouthpiece so that it is in tune with a tuner. With the mouthpiece in this new position, check the stack keys and make any necessary minor adjustments to the top and bottom-stack key heights.
Palm Key Heights
It may be useful at this point to read my article on Tuning a Saxophone with Crescents published in The Saxophone Aspect, Fall 2005. I usually set key heights and tune palm keys at the same time. In this article, we will only discuss the key heights.
Palm keys are simple to set as they are all well-vented notes. With the middle F in tune, set the heights for the palm keys starting on D and working up chromatically. Play a D and lower the key manually until the tone becomes flat or stuffy. Set the key height for the D pad as low as possible without sacrificing tone or making the pitch flat. It is best to consider only tone in the palm keys and lower the pitches if necessary with crescents. However, do not set the palm key heights so low that the notes play flat. When the D key height is set, begin to set the E height then the Eb, etc.
Bell and Side Keys
When the palm key heights are set, set the height for the Side C, Bb, and alternate F# using the same method, note that these are all well-vented notes. Set the low C pad so the D speaks freely in both octaves, this is our last under-vented note. Move on to the Low Eb, B and Bb pads respectively. The low B and Bb pads often need to be set at the same height for mechanical reasons but I have not found this to be a problem.
Congratulations, you have set the key heights for the entire saxophone using your ears as a guide. Paying special attention to under-vented notes during regulation, the instrument is now properly vented and will play with a full tone and good response.
Copyright © 2000-2012
MusicMedic.com
All Rights Reserved