The unique padding system on Buescher saxophones can be alluring or detracting, depending on who you ask. This design was initially created to avoid the time consuming process of floating pads on a bed of shellac and adjusting them until they make a good seal with the tone hole. Instead, the Buescher factory designed metal backed saxophone pads that connect to the pad cup via a spud and a snap in resonator. Once the pad was installed, it would be leveled to the tone hole by adding shims behind the pad and by making small bends in the pad cup, which would in turn bend the pad to cover low spots in a tone hole.
Some technicians still use this traditional method with metal backed pads, but we’ve created a new system at the Sax ProShop that utilizes a combination of padding methods to achieve a great feel and seal. Whatever route you take, we highly recommend leaving the original snaps and spuds intact!
What are the benefits of Metal Backed Pads?
Some players, collectors, and technicians believe that metal backed pads on a Buescher are essential for tone and feel.
As far as the tone of the instrument is concerned, there are some players who believe that metal backed pads are an integral part of the tone production on a vintage Buescher saxophone. The most common reasoning is that the metal backing on the pad transmits sound or vibrations to the keywork and body of the instrument. Since this system is unique to Buescher saxophones, some feel that installing cardboard backed pads on a Buescher may detract from the unique tone.
Some folks believe that the metal backed pads, in combination with the snaps and spuds, produce a feel in the players’ hands that is unique to Buescher saxophones. The feel of a saxophone is essentially the amount of firmness or softness the player senses through their fingers as the pad makes contact with the tone hole. Historical purists believe it’s best to use metal backed pads and shims without shellac to achieve the correct feel in the player’s hands. However, others prefer to use metal backed pads along with either some shellac or a full bed of shellac to help the pad seal better against the tone hole.
What are the benefits of using standard pads in a Buescher?
Many players and technicians prefer to swap the traditional metal backed pads for cardboard backed pads in order to have more pad options and a better seal against the tone hole.
Traditional metal backed pads aren’t necessarily made with the best felt in them or the best leather wrapped around them. Modern pads are available in different levels of firmness, different leathers, and different colors, and forgoing tradition opens up a lot of options for the player.
Further, the installation of non metal backed pads over a bed of shellac allows for more precise leak removal and a better seal. Bending the pad cups in order to remove leaks with metal backed pads and no shellac can cause imperfections in the tone holes and can inadvertently cause bends in the keywork as well. This method does not allow for the type of precision that many professional players demand today.
Removing the Snaps and Spuds
Don't do it! Although it would be an easier job for the technician to simply remove the spuds from the cups and install standard pads in a traditional manner, this is not recommended. Bueschers without their original snaps and spuds lose value and collectability. Many players also believe that snap-in resonators and spuds are an integral part of the sound and feel of a Buescher saxophone. While we don’t have empirical data to support this, we do find that it’s preferable to keep the snaps and spuds and we have some tips and tricks on how to make pad installation a little easier.
How We Pad Buescher Saxophones
The Sax ProShop at MusicMedic works on more Bueschers than any other brand of saxophone! We have a unique assembly-line style saxophone repair facility that allows us to streamline our saxophone Uberhauls. Over the years, we have dialed in the way we prepare a Buescher for padding, which requires a couple of extra steps prior to padding in order to make the whole process more efficient.
Leveling the pad cups is crucial for pad installation, and many times Bueschers will have some pad cups that are wildly unlevel from being bent around throughout their lifetime. When you’re flattening the pad cups over an anvil, you may find that the spud sticks out just slightly beyond the level of the pad cup. In this case, you’ll need to carefully remove a bit of metal from the spud with a file so that the pad cup can sit flat against the anvil.
At the time of updating this article (2022), we are exclusively using RooPads Extreme in our Buescher saxophone overhauls because they offer the best feel, longest lasting results, and far less stickiness than tan pads. RooPads and Extremes are available in white, black, and chocolate, and chocolate has been the leading choice of our clientele. However, you can use any pad of your choosing (as long as they are the appropriate thickness) and we will highlight the process of preparing non metal backed pads for installation on a Buescher.
MusicMedic now offers any sax pad we offer Pre-punched with the correct size holes for Buescher Snaps! - Just order your set with 'Buescher Holes' as your resonator option, or for individual pads- just ask in the comments box at the end of checkout. Skip the first four steps with pre-punched pads!
How To Install Pads on Buescher Saxophones:
Before you get started remove the keys, remove the snap from the spuds, remove the pads, and clean the keys.
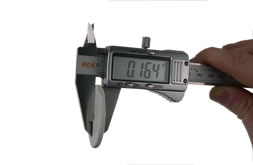
1. Select a pad of the appropriate thickness. Buescher Saxophones work well with 0.160” - 0.169” (4.1-4.2mm) thick pads. Tan Saxophone Pads, Soft Feel Pads, RooPads, and RooPads EXTREME all work for Buescher Saxophones. Just be sure to order pads with no resonators.
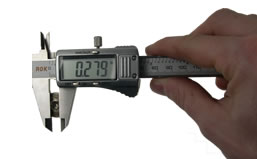
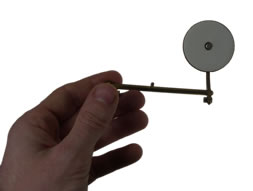
2. Using your caliper, note the smaller diameter of the snap as well as the larger diameter of the snap face associated with the key.
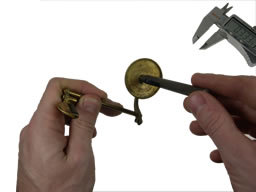
3. Choose a leather punch that is slightly larger than the snap back which goes over the spud but smaller than the resonator snap face. We use the Buescher Hole Punch set which has punches in 6mm, 7.4mm, and 8.9mm diameters and a pad centering base. Use the smallest punch that fits entirely over the spud.
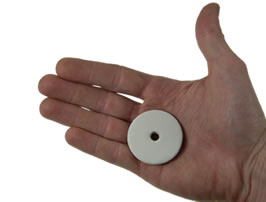
4. Punch a hole in the center of the pad by placing the pad centering base on a bench anvil or hard surface, place the pad on the base, insert the punch, and tap it several times with a mallet or hammer. Check this video link to watch this process.
5. Fit and hole punch the rest of your pads and make sure you have prepared your saxophone for pad installation, including: all body work, keyfitting, leveling tone holes, leveling pad cups, dry fitting pads, the push and pull of installing pads, the four variables of sax pad installation, and any other relevant articles you can find here. Do not skip the preparation of leveling the tone holes, pads cups and dry fitting. Note that dry fitting is most important with Buescher pads as the snap will hold the pad firmly in the center of the cup and 'floating' will be limited.
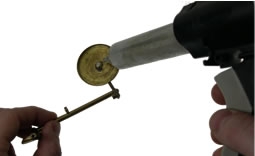
6. Heat the Buescher pad cup with a torch and apply a layer of quality shellac to the back of the cup, being sure that some gets on the spud in the cup. This will help keep the snap from rattling later.
7. Quickly press the pad into the cup while the shellac is still hot and press the snap on the spud. Use caution as the pad cup will be hot.
8. Now, install the key and level the pad in the regular manner outlined in the articles you read earlier. Again, it is important to note that 'floating' will be limited once the snap is on the pad. Be sure you have done your dry fitting completely before you begin your padding.
9. Once you have installed your pad, if you find that it is hitting first in the front after attempting to level it, you may need to install a shim. Select a shim that is slightly smaller than the diameter of the pad you used and punch it with the same method outlined above. To install the shim, remove the key, remove the snap, and apply heat to the back of the pad cup until the shellac melts and the pad can be removed from the pad cup. Add a bit of shellac to the back of the shim, place in the cup, and reinstall the pad.