Installing MusicMedic Saxophone Neck Cork
By Curt Altarac
Tools and supplies that you will need:
- MusicMedic Saxophone Neck Cork
- Contact Cement
- Razor Knife
- Sand Paper
- Pencil
- Straight Edge
- Hammer
- Torch
NOTE: Most of these tools and supplies are available in the MusicMedic Repair Kits.
Prepare the Cork
1. Trim new cork so it is the same width as the cork you are replacing. Always trim cork with a straight edge and your razor knife.
2. Lay your neck cork on a solid flat surface and gently tap the entire surface of the cork with a blunt hammer or mallet. This will soften the cork and reduce its chances of cracking when wrapped around the neck.
Prepare the surface
3. Remove the existing cork and clean the surface that the old cork was on. A little heat from your torch applied to the area where the cork was will burn away old cork and soften adhesives left on the area. Be careful not burn the lacquer on the neck. Rubbing alcohol or Lacquer Thinner might also come in handy for removing the adhesive. When using these chemicals, be certain not to get the on the finish of the saxophone neck.
4. Once the neck is completely clean and free of debris, practice wrapping your new cork around the neck (without glue, this is for practice). If you think your cork is too brittle and may break, try tapping it again with a hammer. This will soften the cork making it more pliable.
5. Note: where the cork ends on the neck and make a line around the circumference of the neck. This line will act as a guide once you start gluing.
Apply the adhesive
6. Now paint a thin coat of contact cement on the un-beveled side of the cork (marked with a large X). Turn the cork over and apply a thin coat of contact cement to the beveled portion of the cork (marked with two smaller X's). Now, all surfaces marked with X's on the cork are painted with contact cement. Careful not to let the cement touch any unintended surfaces and do not touch the cement with your hands. Put the neck cork aside and allow it to dry for about 10 minutes. The amount of time it takes the contact cement to dry is related to humidity but 10 minutes should do.
7. Paint the portion of the saxophone neck that will be covered by the neck cork (area between end of neck and pencil line) and put it aside to dry. Now wait for the contact cement to dry. Don't be impatient here. Let the contact cement dry on BOTH SURFACES about 5-10 minutes (depending on humidity and temperature) before you go any further.
Wrapping the New Cork

Warning: Once the two pieces that are painted go together there is no going back. They will instantly form a permanent bond so be careful.
8.The part of the cork that is completely painted (with the big X) will meet with the cement on the neck.
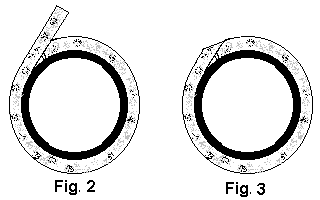
9. Start to wrap the cork on the underside of the neck so the joint will be out of sight. This will leave the painted bevel (2 smaller X's) exposed where you begin. Carefully wrap the neck going back around to the bevel to cover it. (see Figure 2) This part of the job takes a bit of patience; the cork (due to the taper of the neck) will not want to go on straight. Be persuasive with it.
10. Gently trim off excess cork and save for another job. (see Figure 3) The glue on the excess cork will not hurt it, just glue that same side next time you use it.
11. Now cut an appropriate size piece of sandpaper and sand the bevel so it is smooth. Do not over-sand, just take off the lip that is left behind. Be very careful not to mar the finish of your horn.
12. When this is done try putting your mouthpiece on gently. If you think it will fit but is snug, put cork grease on the new cork and work it in with your thumb and first finger: Skip to step 15.
13. If the cork is too big for the mouthpiece to go on, sand it down. Careful not to take off too much. Sand evenly around the neck cork and check if your mouthpiece fits often. Keep in mind that the saxophone neck is tapered you will do well to sand more off the back of the cork to compensate for the taper.
14. When you think the Mouthpiece will fit snugly, work some cork grease into the cork.
15. Put your mouthpiece on your corked and greased neck cork and adjust it until your instrument will play an F (Saxophone F) in tune. At this point, some technicians will work paraffin wax into the cork and use a heat gun to melt it in.
16. Let it sit on the neck overnight. The mouthpiece will leave an impression in the cork leaving you a line that gets you near in tune when you put on your mouthpiece.
17. Apply cork grease often for one week.
Copyright © 2000-2012
MusicMedic.com
All Rights Reserved