Leveling and Re-surfacing a Saxophone Tone-Hole
By Curt Altarac
I have spoken to many other Techs about this procedure, and I realize that everyone has a technique that works well for them. This is the procedure that I use in my shop to level a saxophone tone-hole. My goal in writing this is not to have the "last word" on tone-hole leveling, but simply to offer a technique for your review. If you have another method of leveling tone-holes, I would love to hear about it. Contact me at: Curt@MusicMedic.com.
First, using various dent tools and some firm wooden dowels, the tone hole must be made as level as possible. This will require some judicious bending and prying to get it right. I have had little or no luck tapping down high spots on a tone hole but I have had some success raising low spots.
Some methods of raising low spots include:
Using a Slide Hammer
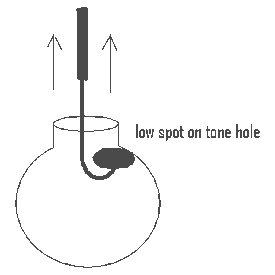
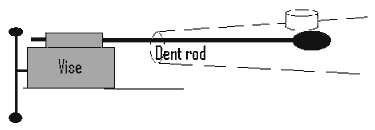
Downward or Rebound Force using a Dent Ball and Dent Rod
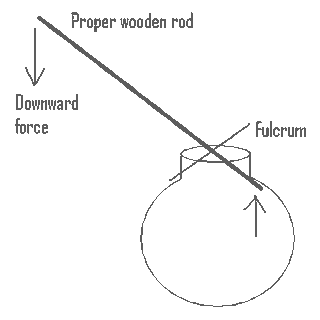
Using Leverage
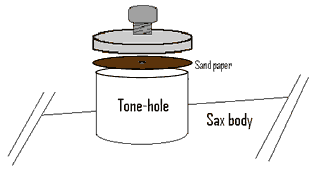
Once the tone-hole is very near level using the above techniques, it will be necessary to re-surface the tone-hole. For this I use the Jim Schmidt tone-hole files sand paper and aluminum foil.
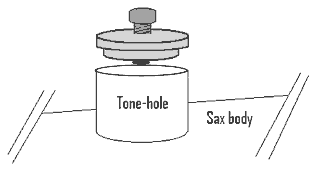
1. With a light inside the instrument, place the back of the appropriate Jim Schmidt file on the tone-hole and check for light escaping around the edges. Let us assume that the tone-hole is now level enough to need only light filing.
2. Take note of the areas where light is escaping.
3. Choose an appropriate size guide and assemble the tone-hole file and guide.
4. Using the provided Allen Wrench, I use a circular motion to spin the file gently on the tone-hole.
I often find myself using the file without guides in a circular motion to take down the high spots on the tone-holes. Using a back and forth motion may not give an even cut. When a back and forth motion is used it should be alternated. That is, if you are filing in a North and South direction the next filing should be done in an East and West motion, followed by a Northeast / Southwest motion etc. In general, circular cutting will give the best results. It is best to use very little pressure and more turns with the file. Heavy pressure will give an uneven cut.
5. Continue to check the tone-hole using the back of file with the light in the tone hole. Once no light is escaping around the rim of the tone-hole it is OK to proceed.
6. This cutting will leave a small burs connected to the rim of the tone-hole. Running a piece of tightly balled aluminum foil around the rim of the tone-hole will knock the burs off. Test this by running your finger around the inside of the tone-hole. If there is still a bur you will feel it. You may need to use an 800 grit sand paper to knock off the stubborn burrs; be careful not to ruin your new level surface.
7. With the tone-hole level and free from burrs, it's time to polish the scratches from the tone-hole. Cut disks of the 600, 800, 1200, and 2000 grit sand papers the same diameter as the file. Place the 600 grit paper on the diamond abrasive side of your file. The abrasive will grip the back of the sand paper and hold it in place. With the same circular motion as above give a few turns of the file with the 600 grit sand paper touching the tone-hole. It is important to use very light pressure on the tone-hole.
8. Continue to check that no light is escaping the tone-hole rim as you gently polish the tone-hole.
9. Move to the 800 grit sand paper and remove the finer scratches; then the 1200 and the 2000.
10. You may want to seal the tone-hole rim by plating or a thin coat of lacquer.
Once completed, you will have a perfectly level tone-hole that will insure perfect seating of the pad for years.
Copyright © 2000-2012
MusicMedic.com
All Rights Reserved